|
|
|
|
|
|
|
|
|
|||||||
|
... |
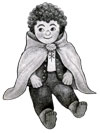
How to make a HOBBIT sock doll by Lobelia
MATERIALS For doll: For clothes: TOOLS For making doll and clothes: PATTERNS
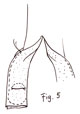
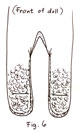
Download all the patterns in one file [ 1.7 MG Zip File ] SEWING INSTRUCTIONS Lay the sock out flat, front over back, and cut as illustrated to make three pieces, head/ body/legs (all one piece) and two arms. (Fig. 1) 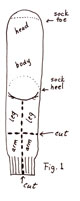 Fold arm pieces in half right sides together and sew around two sides. Leave the finished end (the edge of the sock that is "ribbed" or elasticized) open. (Fig. 2) 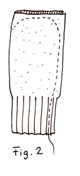 To make "feet:" open out each leg and draw a "fish," or pointed oval, shape about 1/3 of the way up from the bottom, on the front half of the leg ONLY. Draw a "sole" on the back half of the leg where the foot will be. You can make hairy hobbit feet by embroidering or painting To machine embroider, set the tension for darning. Use brown thread and stitch irregularly all over the top, sides and back (not the sole area or the "fish"-shaped dart) of each foot and ankle (Fig. 3). If you prefer to hand-embroider or paint the hairy feet, do it after the doll is stuffedˆit's easier. Also after the doll is stuffed, you can paint the soles of the feet to make them look leathery. 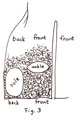 Fold each leg crosswise, right sides together, along the ellipse shape; sew along curved line (Fig. 4). Fold legs in half lengthwise, inside out (Fig. 5) and sew around two sides, leaving each leg open for at least 1" at the top. Turn the legs right side out. There will be an opening of about 2-3" at the crotch through which the doll will be stuffed (Fig. 6). 
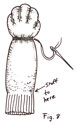
Stuff hands lightly. Sew "fingers" with overcast stitches, pulling tightly to make the sock puff out in between the stitches (Fig. 7). Stuff the rest of the arm firmly to about 1" from end. Cut 4 strands of thread and wrap tightly around arm 5 times to define "wrist"; take several stitches to fasten off, cut thread (Fig. 8). 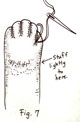
Stuff the doll's head (the sock toe) and upper body firmly. TIP: FOR A SOFT- SCULPTURED FACE: Roll a tiny ball of stuffing for the nose, a larger one for each cheek, and an in-between sized one for the chin. Wedge these in just under the surface of the face area so they create bulges where these features would ordinarily be (Fig. 9). These will make the face look more three-dimensional after the features are added. 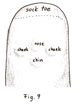
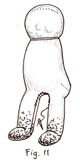
Cut 4 strands of thread and wrap tightly 5 times around the doll's body to define a "neck;" take several stitches to fasten off, cut thread (Fig. 10). Stuff the rest of the body and the legs firmly. Sew the opening closed using tiny overcast stitches and double thread (Fig. 11). If the doll is likely to be played with and not merely used as an ornament, sew this seam twice and fasten ends off firmly. 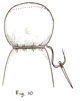
Sew the arms firmly to the sides of the body just below the "neck" (Fig. 12). Make toes the same way you made fingers, Fig. 7. 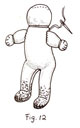
Make the face. (See diagram, Fig. 13.) Use a needle to maneuver the little "nose" stuffing into the proper position. It should be horizontally centered, vertically just below centre. Take a tiny stitch just below the bulge, then wrap thread tightly around and around the ball and pull it tight to make a round nose. Take several stitches to fasten, cut thread. 
Draw the outline of the eyes and mouth lightly using ball point pen, a soft pencil or a fabric marker. Embroider or paint eyes and mouth. Use dark brown for eyebrows and the outlines and pupils of the eyes, medium brown for the irises, and rose for the mouth. SOFT SCULPTURE DETAILS: If desired, thread a long needle with double thread the colour of the sock. Fasten the thread with a couple of stitches at the back of the doll's head. Run the needle straight through the head to the corner of one eye. Take a tiny stitch there and poke the needle straight back through the head, pulling thread tightly to create an indentation. Repeat for the other corner of that eye, then do the other eye the same way. Do the two corners of the mouth the same way (Fig. 14ˆ"x 's" indicate placement for these stitches). Run the needle back through to the back of the head, fasten off firmly with several stitches there and cut thread. The doll's hair will cover all the stitches back there. If desired, apply a little cosmetic blush or some pink or red pencil to the cheeks to make them look rosy (this may need to be re-applied after every time you wash the doll.) You may also paint or hand-embroider the doll's feet now. 
Hair: Make a cardboard template: cut a slit about �" wide down the length of the cardboard to about 1" from the end. Cut a tiny notch near the closed end. Tucking the free end of the yarn into this notch to keep it in place, wrap yarn around the cardboard in a figure-8 style all the way to the ends (Fig. 15). Make sure the sides stay parallel, as they will want to draw together near the open end if you pull the yarn too tight. Using the sewing machine, stitch down the middle between the strips, then stitch back over the same line and cut thread. Slide the double row of "curls" off the cardboard, put it aside and repeat the process to make a second row. 
To attach the hair to the doll's head: starting at about where one of the ears would be, pin one row of curls across the doll's front hairline (Fig. 16). Continue pinning the curls across behind the first row, zigzagging or spiralling back and forth and continuing with the second row of curls until the head is filled (Fig. 17). The rows should be close enough together that the head is not visible in between them. If you happen to run out of curls, make another row using the cardboard template. Once the hair is pinned on the way you want it to look, sew it by hand to the head along the central machine stitching lines, using double thread. Be sure to attach the ends very firmly as that's where it is most likely to come loose if kids get hold of the doll. 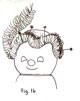

CLOTHES: The garment patterns included with these directions were designed to fit a doll made from a standard woman's crew-length cotton sport sock. However, due to manufacturing differences as well as individual variations in cutting, sewing and stuffing, doll sizes may vary. You can measure your finished doll and alter the patterns as needed. Shirt: Narrowly hem or overlock the wrist and neck edges, including the front slit. With right sides together, sew side seams. Hem or overlock the bottom edge. Thread a large needle with six-ply embroidery floss or thick crochet cotton. Starting at the bottom of the slit, make a zig-zag closure up the front of the shirt opening (like lacing a shoe). Leave about 6" ends ; make large knots in the ends so the thread won't come undone, and tie in a bow (Fig. 18). 
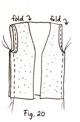
Waistcoat: Snip side seams about 1/4" at arrows. Narrowly hem or overlock each side between the snips (these will be armholes, Fig. 19.) Fold the waistcoat in half, right sides together, with the shoulders at the top. Sew side seams (Fig. 20). Narrowly hem or overlock the bottom, front edges, and neck edge, starting at one side seam on the bottom edge. Sew four small buttons to the right front edge and make "fake" (or real) buttonholes along the left front edge. 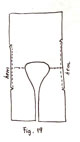
Trousers: Sew the inseam up one leg and down the other, making 90 degree turns at the crotch as shown (Fig. 21). Sew over the crotch seam again for about 1" each side. Snip to the corners so the seam will lie flat. 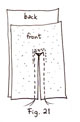
When the trousers are turned right side out. Hem or overlock the bottom leg edges. With right sides together, line up side seams, making a pleat at about hip level on each side to accommodate the doll's "seat," which is the heel of the sock (Fig. 22). Stitch the side seams. Cut a piece of elastic to fit snugly around the doll's waist. Sew the ends together, forming a circle. Place this circle along the wrong side of the trousers' waist edge and fold the waist down over it to make a casing. Pin in place 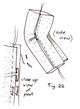
evenly, stretching the elastic to fit, then zigzag through all layers to hold the elastic in place (Fig. 23). 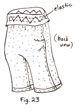
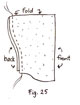
Elven-cloak: If the fabric you are using is a very silky one that ravels easily (as mine was) I recommend you first overlock or zigzag the back-seam edges of the hood, and the neck edges of both the hood and the cloak, separately, before sewing any seams. This will make the pieces easier to handle and less frustrating (Fig. 24). Don't finish the outer edges of the hood or cloak as these will be done at the end. After finishing these edges, fold the hood in half and sew the back seam (Fig. 25). Pin the neck edge of the hood to the neck edge of the cloak, easing as necessary to fit; sew neck seam. Narrowly hem or overlock all outer edges of hood and cloak. Make a thread loop at right front edge of neck and sew leaf-shaped button to left front edge. Or attach small snaps and sew the button on top for looks. 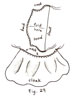
Dress the doll. Your "hobbit" is now finished! CARE INSTRUCTIONS Machine wash doll and garments in a mesh bag (recommended), or hand wash. If hand washing, rinse well, then roll doll in a thick towel to remove as much water as possible. Machine or line dry.
|
||||||||